
![]() Digital AV Support > Digital Camera > LUMIX LINK for Android
Digital AV Support > Digital Camera > LUMIX LINK for Android
Text begins from here.
LUMIX LINK for AndroidTM
| What is LUMIX LINK |
“LUMIX LINKEis an application software enabling remote control over LUMIX digital cameras with Wi-Fi® connectivity (DMC-GH3/SZ5/FX90).
Remote shooting, browsing, data transfer and uploading to SNS can be operated using a smartphone or tablet with this application.
<Main Features (Compliant Model) >
| ▪“Live View Remote” function is available, which enables remote shooting while monitoring live view image of the camera on the smartphone / tablet and shoot pictures.(GH3/SZ5/FX90) | |
▪“Aperture”, “Shutter Speed”, “Exposure Compensation”, “ISO Setting”, “White balance” can be adjusted
while monitoring live view image of camera in remote control.(GH3) |
|
▪Focus control using a variety of “AF(Auto Focus) mode” and “MF(Manual Focus) mode” is available in remote control.(GH3) |
|
▪”Touch Shutter” enables focusing and shutter release by just touching the target point on the camera’s live view image
in remote control.(GH3) |
|
▪All settings in the camera’s “Q(Quick)-MENU” can also be adjustable in remote control.(GH3) |
|
▪Video can be recorded with timer setting in remote control.(GH3) |
|
▪Images can be transferred to the smartphone / tablet automatically right after shooting.(GH3) |
|
| ▪Images stored in the camera can be transferred to the smartphone / tablet and uploaded to SNS.(GH3/SZ5/FX90) | |
| ▪Images stored in the camera can be browsed, deleted, copied to be transferred to the smartphone / tablet and uploaded to SNS.(GH3/SZ5/FX90) | |
| ▪”Geo-tagging” function enables adding geographical information acquired with the smartphone / tablet to the images stored in camera. | |
| ▪Image data can be synchronized with the LUMIX CLUB Cloud Sync. service.(GH3/SZ5/FX90) |
[Notes]
- Continued use of GPS running in the background can dramatically decrease battery life.
- In order to use the SNS upload functions and Cloud Sync. Service, you must first obtain a service user ID for Panasonic’s service LUMIX CLUB (free of charge).
- This function is not available on smartphones / tablets not equipped with the location information acquiring function.
This application is compatible with smartphones with the following OS versions.
- Android 2.2 - 4.2
|
LUMIX LINK Market page |
|
|
|
LUMIX CLUB settings |
|
|
|
| [1] Remote recording |
- Connect smartphone / tablet to digital camera via Wi-Fi
- For connection procedure, see instructions for each device. - Start [LUMIX LINK] and tap (1) at bottom of screen to display recording screen
- Since Wi-Fi connection drains battery quickly it is better to recharge before use when power is low.
- Tap shutter button (5)
- When the digital camera is set to Burst mode, tap (5) to take multiple pictures in quick succession.
- Tap

-Icon will change to , and taking a picture with the Touch Shutter function becomes possible.
 -
Touch the subject you wish to focus on, and then take a picture.
-The picture is taken when the focus is achieved.
-Tap once again to cancel the Touch Shutter function.
- Tap zoom button (6) / (7)
- Tap it toward T (telephoto) to magnify and toward W (Wide) to widen zoom. Zoom lever (10) can also be used to adjust focus. To quick-shift, tap (8) / (9) .
- Magnification is shown on zoom bar at bottom of screen.
* The actual screen when taking pictures is not flipped.
- Tap menu button (4)
- Tap [Live Control Settings]
- Turn [Self shot mode] [ON]

[Figure 1] |
Explanation follows below.
| Item | Contents |
| [Face Detection] | Recognize people's faces, adjust focus point and exposure. |
| [AF Tracking] | Adjusts to the set subject and exposure.The focus point and exposure will follow even if the subject moves. |
| [23-Area] | When the subject is not the center of the screen, AF Area can focus on up to 23-Areas. |
| [1-Area] | After the focus point has been selected , the AF Area frame in the center of the screen will focus accordingly. |
| [Pinpoint] | When you want to focus on a point smaller than [1-Area] , use the enlarged view and select a focus point. |
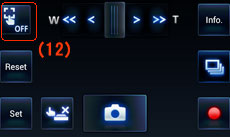
- Tap [Reset] to return the AF Area frame to the center of the screen.
- Tap (12) to clear the AF Area frame settings.
- To change [AF Mode], change the settings on the digital camera, or go to [Menu] (4) > [Recording Settings] > [AF Mode] and change the settings.
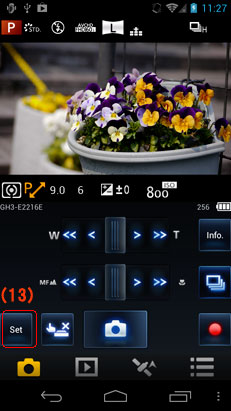
[Figure 2] |
You can adjust the sliding bar shown below by dragging it.
(During vertical display) |
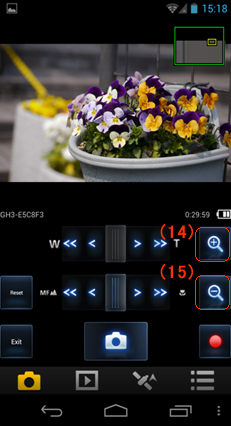
* Display [MF Assist] (Manual focus ASSIST)(Figure 4)
- Tap the recording screen to switch to the MF Assist screen, and display zoom.
- Tap (14) / (15) to enlarge/shrink the image.
- Tap [Reset] to return the magnified position to the center.
Options will change depending on the digital camera's settings.
| Item | Contents |
| [Aperture/Shutter Speed] | Shutter speed will be adjusted to the set aperture. If shutter speed is given priority, the aperture will be adjusted. |
| [Program Shift] | Shutter speed and aperture level can be adjusted together to the same exposure. |
| [Exposure] | Exposure compensation can be set. |
| [Sensivity] | Sensivity (sensivity to light) can be set. |
| [White Balance] | White Balance (hue) can be set. |
- Tap
 to return to the previous screen.
 - Setting options and setting levels are part of the digital camera. All of the setting options and setting levels will not be displayed.
- Operation may differ from the digital camera.
- After changing settings, the quality of the image displayed on your smartphone / tablet can differ from the image displayed on your digital camera. It is recommended that you check image quality using the playback screen on your digital camera.
* This is the icon for [Single]. The displayed icon differs depending on the digital camera's settings.
Options will change depending on the digital camera's settings.
| Item | Contents |
| [Single] | Takes pictures in Single mode. |
| [Burst] | Setting gor Burst can be adjusted. Multiple pictures can be taken in quick succession while the shutter button (5) is being tapped. |
| [Auto Bracket] | Setting for Auto Bracket can be adjusted. Each time the shutter button is pressed, up to 7 pictures will be taken while the exposure is being changed according to the exposure correction scroll. |
| [Self Timer] | Self Timer can be set. |
[Figure 3] |
[Figure 4] |
- Tap menu button (4)
- Tap [Recording Settings] > [Recording time]
- Set Recording time
- Tap (1) at the bottom of the screen to show the recording screen
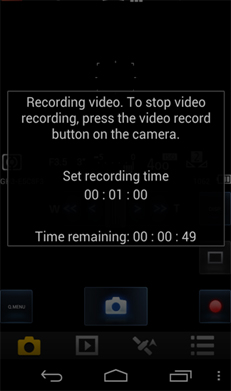
- Tap

Recording is started.
- While recording, the remaining recording time is displayed on screen. The clip being recorded will be displayed on the digital camera. When recording has finished, you will return to the previous screen.
- Recording videos is set to the timer function. You cannot stop recording partway through using a smartphone / tablet.
- The recorded image will be saved to the digital camera.
To playback added images, tap (2) go to the playback screen, and change the referents (-->Switching referents) to [Camera Roll] or [Gallery].
- It may take some time to display the information.
[Figure 5] |
- Connect smartphone / tablet to digital camera via Wi-Fi
- For connection procedure, see instructions for each device. - Start [LUMIX LINK] and tap (1) at bottom of screen to display recording screen
- Tap shutter button (5)
- Tap zoom button (6) / (7)
- Move it towards T (telephoto) to magnify and towards W (Wide) to widen zoom. To quick-shift, tap (8) / (9)
- Magnification is shown on zoom bar at bottom of screen.
- Operations may differ with settings on each connected digital camera.
* This function is not available on DMC-FX90
 |
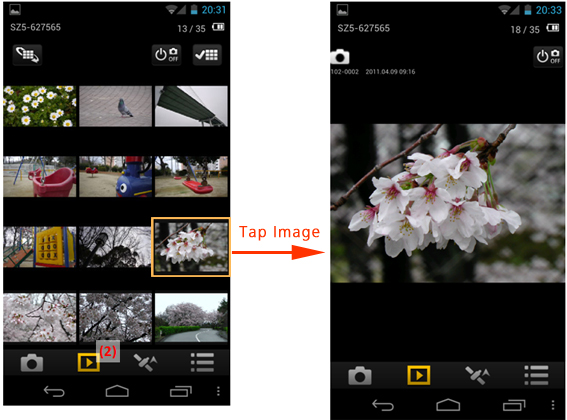
| [2] Playing back images on digital camera |
This function is not available on DMC-FX90.
- Connect smartphone / tablet to digital camera via Wi-Fi
- For connection procedure, see instructions for each device.
- Start [LUMIX LINK] and tap (2) at bottom of screen
Multiple image list appears . (Multi Playback) - Tap image to play back
Images are played back.
 |
| [3] Saving digital camera images on smartphone / tablet, sending them to websites, sharing them with other devices |
Saving to smartphones / tablets is not available on DMC-FX90. Smartphones cannot process images in DMC-FX90. Only images stored in [Gallery] can be sent to websites and/or shared with other devices.
- Connect smartphone / tablet to digital camera via Wi-Fi
- For connection procedure, see instructions for each device. - Start [LUMIX LINK ] and tap (2) at bottom of screen to display playback screen
- Press and hold image for more than 1 sec
Forward destination tabs will show at top, bottom, left and right of screen. - Drag image to desired forward destination tab
Following forward destination tabs will show in initial settings:
(10)  Save in smartphone / tablet
- Saving may be slow depending on image size(11)  Send to [LUMIX CLUB].
- You need to log in with your ID. Tap [Sign up] and follow registration instructions to get a login ID.
* By uploading images to our website LUMIX CLUB, you can download them to Panasonic AV equipment in your home or elsewhere, and you can also submit them to sharing services on websites run by other companies.(12)  Delete images.
- Protected images will not be deleted. - Setting up other forward destination tabs
Tap [MENU] (4) > [Playback Settings] > ["Picture Share" settings] and drag icons on screen to tabs displayed at top, bottom, left and right of screen to set tabs as forward destinations.
 |
- Tap [MENU] (4)
- Tap [Playback Settings] > [LUMIX CLUB settings]
- Activate [Utilize LUMIX CLUB functions]
- You need to log in with your ID. Tap [Sign up] and follow registration instructions to get a login ID. - Tap [Cloud sync. Settings]
- Follow setting instructions on screen
| [4] Adding location information from smartphone / tablet onto digital camera images |
This function is not available on DMC-FX90.
- Connect smartphone / tablet to digital camera via Wi-Fi
- For connection procedure, see instructions for each device.
- Activate location information option on smartphone / tablet
- Start [LUMIX LINK ] and tap (3) at bottom of screen
- Tap [Time sync] (13) to adjust current time on digital camera
- Set [Record location information] (14) to ON option.
- Max. location data storage capacity is 600,000 entries. * New entries exceeding max. amount will overwrite older data.
* Approx. recording period is 1 month at a 5-sec. [Recording interval].
- Turn off [Record location information] when not using it as it consumes battery quickly while active. - Tap [Send location data] (15) to send such data to digital camera
- For using sent location data, see digital camera operating instructions.
- Tap [Recording interval] (16) to select location information recording interval. 1, 5, 15, 30, 60 sec. intervals are available.
- Tap [Operation log] (17) to display location information recording logs. Max. log storage capacity is 20 entries. New entries exceeding max. amount will overwrite previous data.
 |
- YouTube is a trademark of Google Inc.
- Facebook (R) is a registered trademark of Facebook, Inc.
- Other names of systems and products mentioned in the [Help] section are usually the registered trademarks or trademarks of the manufacturers who developed the system or product concerned.